SharePoint Conference 2009 Follow Up & Session Materials
November 3, 2009
HOW TO: Register an External Content Type with the SharePoint Search Service to make the data searchable
November 12, 2009The Business Context
In many large organizations business data is stored inside of flat files from mainframes or other legacy systems. These systems chug along just fine everyday and support many key elements of the business; they aren’t going away anytime soon. Traditionally, accessing flat file data, making it viewable in a web pages, and making it searchable requires an enormous amount of custom code.
The Solution
New functionality inside SharePoint 2010’s Business Connectivity Services (BCS) makes it extremely easy to connect to flat file data sources (or any other data source), display it in web pages, and make it searchable. This blog post is the first in a 2 part series which describes how to create a SharePoint 2010 BCS .NET Assembly Connector to read data from a flat file and register it as an external content type in SharePoint. Part 2 of this blog post series (coming tomorrow) demonstrates how to register an external content type with the SharePoint search service to make the data searchable.
As you may already know, SharePoint 2010’s BCS provides the ability to connect databases, web services, and WCF services right out of the box. In the last version of SharePoint if we wanted to connect to another type of data source we would create a web service to connect to the data source then connect the BDC to our custom web service. That’s no longer how things are done. Now, a .NET Assembly Connector is used to connect to data sources the BCS does not natively support. A .NET Assembly Connector is a .NET assembly which the BCS uses as a proxy to connect to data sources. The .NET Assembly Connector defines the entities returned from the data source and includes the implementation code to connect to the data source and return the information.
This example shows how a .NET Assembly Connector may be used for read operations, however they may also be used for write operations. I will be posting another blog post on that topic shortly.
Nick Swan is also actively working with the SharePoint 2010 BCS. You can read more posts about this topic his blog:
BCS Shims – .NET assembly as a data source for Business Connectivity Services
Business Data Connectivity Model – Finder Method
Create the flat file data source
This example reads data from a flat file located on the SharePoint server. It is unlikely that you will be reading the contents of a flat file located on your SharePoint server, most likely the file will be stored on a file share on your network. To keep the example simple I’m placing the flat file on the SharePoint server.
To create the flat file (data source) follow these steps:
- Create the following directory on your SharePoint server
C:DATA
- Open your favorite text editor and create a file called flat-file-data-source.txt
- Paste the following sample data into the file
1,Contoso,Orlando,Gee,8713 Yosemite Ct.,Bothel,WA,98011,555-123-4567,1:23 PM 11/3/2009
2,AdventureWorks,Keith,Harris,1318 Lasalle Street,Bothel,WA,98011,555-246-8102,3:23 PM 11/3/2009
3,Litware,Donna,Carreras,9178 Jumping St.,Dallas,TX,75201,555-987-6543,5:23 PM 11/3/2009
4,Progressive Sports,Janet,Gates,9228 Via Del Sol,Phoenix,AZ,85004,555-765-4532,11:23 AM 11/4/2009 - Save the file in the C:DATA directory
As you can see, the flat file contains comma delimited information about customers, including their ids, names, points of contact, and associated contact information.
Create the Project
Update: November 30, 2009 : I posted the completed code for this project. You can download it here.
To create a .NET Assembly Connector use the Business Data Connectivity Model project type in Visual Studio 2010. Follow these steps to create the .NET Assembly Connector.
- Open Visual Studio 2010 Beta 2
- Click File, select New, select Project
- In the Installed Templates section expand Visual C#, expand SharePoint, and select 2010
- Select the Business Data Connectivity Model project type
- In the Name textbox enter FlatFileBDCModel
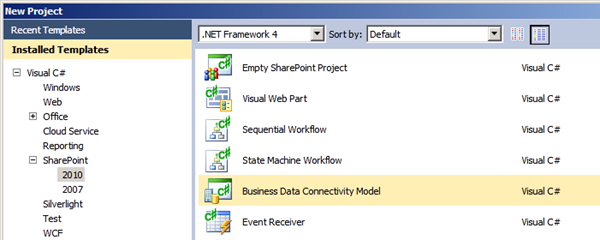
6. Click OK
7. Specify the SharePoint site where you would like to deploy and debug the project
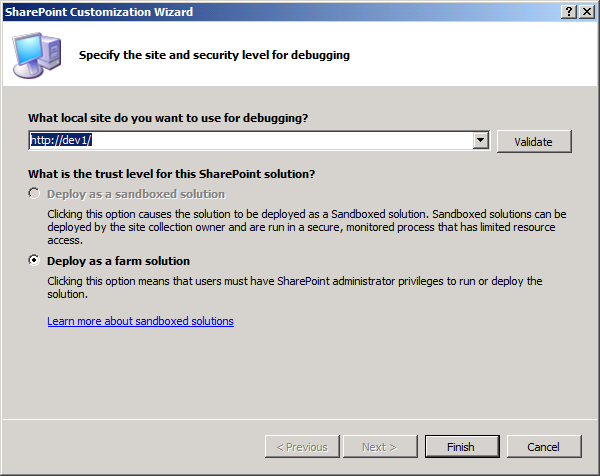
8. Click Finish
Project Inventory
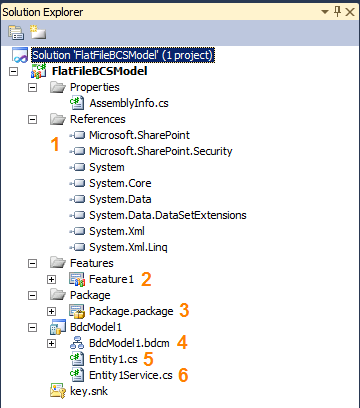
Before customizing the project, let’s take a moment to understand the files in it. Here you can see all the files in the Solution Explorer:
The following table describes what the numbered elements in the image above are used for.
| Element # In Screenshot Above | Description |
| 1 | References to the SharePoint assemblies are automatically added to the project. |
| 2 | A feature containing the BDC Model and .NET Assembly Connector. |
| 3 | A package (WSP) containing the feature and supporting files. |
| 4 | The BDC Model which defines the data source, how to connect to it, how to query it, and what type of information it returns. |
| 5 | A .NET class defining an entity the BDC Model returns. |
| 6 | A .NET class containing the code used to connect to the data source, query it, and return the entities it contains. |
Defining the Entity
Before creating a BDC Model which defines the data source, how to connect to it, how to query it, and what type of information it returns, an entity must be defined. As mentioned in the table above, the Entity1.cs file defines an entity the BDC Model returns. The next step is to create an entity which maps to the data in the flat-file-data-source.txt file. To create the entity follow these steps:
- In the Solution Explorer, right click Entity1.cs and select Rename
- Rename the file FlatFileEntity.cs
- Click Yes
- In the Solution Explorer, right click FlatFileEntity.cs and select Open
- Delete all the code inside the FlatFileEntity class
- Next, create properties in the FlatFileEntity class to map to the data in the flat-file-data-source.txt file. Do this by adding the following code inside the FlatFileEntity class
public string ID { get; set; }
public string Company { get; set; }
public string FirstName { get; set; }
public string LastName { get; set; }
public string Address { get; set; }
public string City { get; set; }
public string State { get; set; }
public string ZipCode { get; set; }
public string Phone { get; set; }
public DateTime LastUpdated { get; set; } - Save the FlatFileEntity.cs class
The completed class looks like this after the properties are added:
using System;
using System.Collections.Generic;
using System.Linq;
using System.Text;

namespace FlatFileBCSModel.BdcModel1
{
    public partial class FlatFileEntity
    {
        public string ID { get; set; }
        public string Company { get; set; }
        public string FirstName { get; set; }
        public string LastName { get; set; }
        public string Address { get; set; }
        public string City { get; set; }
        public string State { get; set; }
        public string ZipCode { get; set; }
        public string Phone { get; set; }
        public DateTime LastUpdated { get; set; }
    }
}
Defining the Entity Service Class
Once the entity is defined, create the entity service class which queries the data source (flat-file-data-source.txt) and returns entities. The entity service class defines the finder and specific finder methods used to return entities from the data source. The ReadList() method defines the finder method for the BDC Model. The finder method is responsible for returning all the entities in the data source. This method returns an IEnumerable generic collection of entities. In this example the ReadList method returns an IEnumerable collection of FlatFileEntity objects (the entity class, created above).
The ReadItem(string id) method defines the specific finder method for the BDC Model. The specific finder method is responsible for returning a single entity from the data source. The specific finder method returns an object representing the entity. The id parameter passed into the ReadItem(string id) method is used to query the entities in the data source and return the entity whose identifier matches the parameter. In this example the ReadItem(string id) method returns a FlatFileEntity object (the entity class, created above).
To create the entity service class follow these steps:
- In the Solution Explorer, right click Entity1Service.cs and select Rename
- Rename the Entity to FlatFileEntityService.cs
- Click Yes
- In the Solution Explorer, right click FlatFileEntityService.cs and select Open
- Add a using statement to the FlatFileEntityService.cs file to support file IO with the flat-file-data-source.txt file.
using System.IO; - Next, create a method to return entities from the flat-file-data-source.txt file. This method opens the text file, iterates through each row of data, parses the data, creates an instance of the FlatFileEntity object for each row, sets the properties accordingly, adds the FlatFileEntity object to the IEnumerable generic collection, and finally returns the entire collection. Essentially this method returns strongly typed objects representing the data in the flat-file-data-source.txt file. To create this method add the following code to the FlatFileEntityService class.
public static List<FlatFileEntity> GetAllEntities()
{
    List<FlatFileEntity> flatFileEntityList = new List<FlatFileEntity>();

    TextReader textReader = new StreamReader(@"c:dataflat-file-data-source.txt");

    string row;

    while ((row = textReader.ReadLine()) != null)
    {
        FlatFileEntity flatFileEntity = new FlatFileEntity();

        string[] entityData = row.Split(',');

        flatFileEntity.ID = entityData[0];
        flatFileEntity.Company = entityData[1];
        flatFileEntity.FirstName = entityData[2];
        flatFileEntity.LastName = entityData[3];
        flatFileEntity.Address = entityData[4];
        flatFileEntity.City = entityData[5];
        flatFileEntity.State = entityData[6];
        flatFileEntity.ZipCode = entityData[7];
        flatFileEntity.Phone = entityData[8];
        flatFileEntity.LastUpdated = DateTime.Parse(entityData[9]);
        flatFileEntityList.Add(flatFileEntity);
    }

    textReader.Close();

    return flatFileEntityList;
} - Next, create the finder method. To do so first locate the ReadList() method and delete the sample code inside it.
- Then add the following code inside the ReadList() method. This code uses the GetAllEntities method to return all the entities in the flat-file-data-source.txt file.
return GetAllEntities().ToArray(); - Next, create the specific finder method. To do so first locate the ReadItem(string id) method and delete the sample code inside it.
- Then add the following code inside the ReadItem(string id)method. This code returns the entity in the flat-file-data-source.txt file whose identifier matches the id parameter passed into the method.
-
foreach (FlatFileEntity entity in GetAllEntities())
{
    if (entity.ID == id)
    {
        return entity;
    }
}

return null; - Save the FlatFileEntity.cs class
The completed class looks like this:
using System;
using System.Collections.Generic;
using System.Linq;
using System.Text;
using System.IO;

namespace FlatFileBCSModel.BdcModel1
{
    public class FlatFileEntityService
    {
        public static FlatFileEntity ReadItem(string id)
        {
            foreach (FlatFileEntity entity in GetAllEntities())
            {
                if (entity.ID == id)
                    return entity;
            }
            return null;
        }

        public static IEnumerable<FlatFileEntity> ReadList()
        {
            return GetAllEntities().ToArray();
        }

        public static List<FlatFileEntity> GetAllEntities()
        {
            List<FlatFileEntity> flatFileEntityList = new List<FlatFileEntity>();

            TextReader textReader = new StreamReader(@"c:dataflat-file-data-source.txt");

            string row;

            while ((row = textReader.ReadLine()) != null)
            {
                FlatFileEntity flatFileEntity = new FlatFileEntity();

                string[] entityData = row.Split(',');

                flatFileEntity.ID = entityData[0];
                flatFileEntity.Company = entityData[1];
                flatFileEntity.FirstName = entityData[2];
                flatFileEntity.LastName = entityData[3];
                flatFileEntity.Address = entityData[4];
                flatFileEntity.City = entityData[5];
                flatFileEntity.State = entityData[6];
                flatFileEntity.ZipCode = entityData[7];
                flatFileEntity.Phone = entityData[8];
                flatFileEntity.LastUpdated = DateTime.Parse(entityData[9]);
                flatFileEntityList.Add(flatFileEntity);
            }

            textReader.Close();

            return flatFileEntityList;
        }
    }
}
As previously mentioned, the assembly which is created when this code is compiled is referred to as a .NET Assembly Connector.
After the entity and entity service are defined it is possible to create the BDC Model which defines how to connect to the data source, how to query it, and what type of information it returns. The BDC Explorer and the BDC Model designer are used to define the BDC Model. Both of these new VS 2010 components are described below.
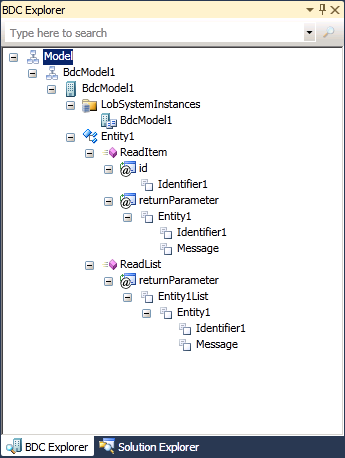
BDC Explorer
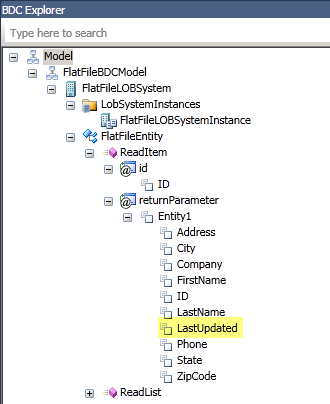
Visual Studio 2010 now includes the BDC Explorer (shown below) which may be used to create the BDC Model.
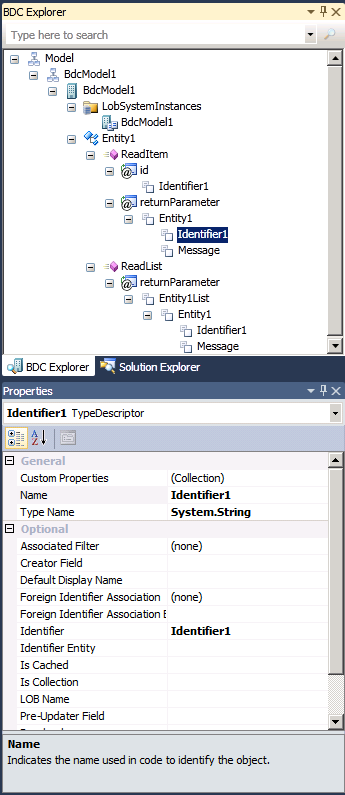
The BDC Explorer works with the Properties window to allow you to inspect and modify the BDC Model. The screenshot below demonstrates this. When Identifier 1 is selected in the BDC Explorer the corresponding properties are displayed in the Properties window.
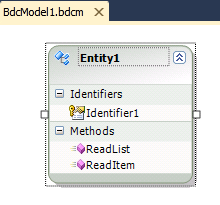
BDC Model Designer
Visual Studio 2010 now includes the BDC Model Designer (shown below) which is used to create the BDC Model.
The BDC Model Designer works just like the BDC Explorer with the Properties window.
Defining the BDC Model
- To begin, open the BDC Explorer by right clicking on the BDCModel1.bdcm file in the Solution Explorer and selecting Open. You will notice the BDC Model Designer opens.
- Then, in the View Menu, select Other Windows and select BDC Explorer.
- The first thing to do is to rename the BDC Model. To rename the BDC Model, select BDCModel1 in the BDC Explorer. There are many nodes in the BDC Explorer named BDCModel1 by default, select the highlighted one shown below.
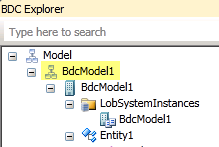
- In the Properties window change the Name property to FlatFileBDCModel
- The next thing to do is to rename the LOB System. To rename the LOB System, select BDCModel1 in the BDC Explorer. There are many nodes in the BDC Explorer named BDCModel1 by default, select the highlighted one shown below.
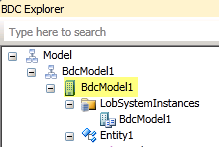
- In the Properties window change the Name property to FlatFileLOBSystem
- The next thing to do is to rename the LOB System Instance. To rename the LOB System Instance, select BDCModel1 in the BDC Explorer. There are many nodes in the BDC Explorer named BDCModel1 by default, select the highlighted one shown below.
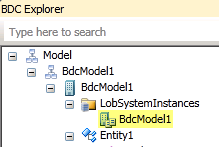
- In the Properties window change the Name property to FlatFileLOBSystemInstance
- The ShowInSearchUI property on the FlatFileLOBSystemInstance must be set to allow the FlatFileLOBSystemInstance to be crawled and searched by the SharePoint search service. This property does not have to be set if the LOBSystemInstance will not be crawled or searched. To set the ShowInSearchUI property on the FlatFileLOBSystemInstance click the FlatFileLOBSystemInstance node in the BDC Explorer.
- Then, in the Properties window click the button in the Custom Properties row.
- In the Properties Editor, add the ShowInSearchUI property, with a data type of System.String and a value of x.

- Click OK
After the LOB System and LOB System Instance are configured the Entity and its properties are configured.
- Rename the entity in the BDC Model to match the entity defined in the .NET Assembly Connector. To do this, select Entity1 in the BDC Explorer.
- In the Properties window change the Name property to FlatFileEntity
- The RootFinder property on the finder method must be set to specify the finder method used to enumerate the items to crawl. This property does not have to be set if the finder method is not used for crawling. To set the RootFinder property on the finder method click the ReadList node in the BDC Explorer.
- Then, in the Properties window click the button in the Custom Properties row.
- In the Properties Editor, add the RootFinder property, with a data type of System.String and a value of x.

- The next step is to set the identifier for finder method return parameter in the entity. To do so first select the Identifier1 node under the finder method return parameter for the FlatFileEntity (highlighted below).
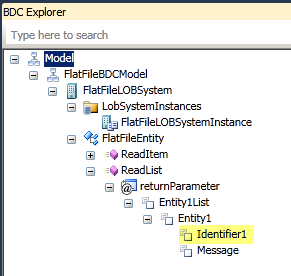
- Then, in the Properties window change the Name property to ID
- Next, set the identifier for the specific finder return parameter in the entity. To do so first select the Identifier1 node under the specific finder method return parameter for the FlatFileEntity (highlighted below).
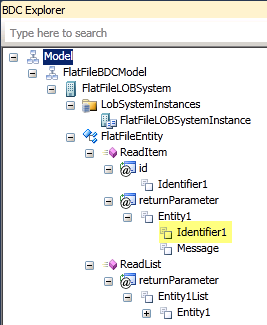
- Then, in the Properties window change the Name property to ID
- Finally, set the identifier for the specific finder input parameter in the entity. To do so first select the Identifier1 node under the specific finder method for the FlatFileEntity (highlighted below).
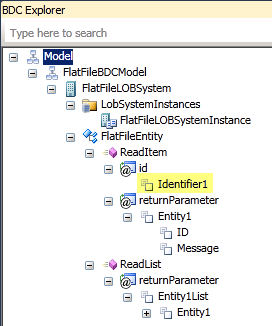
- Then, in the Properties window change the Name property to ID
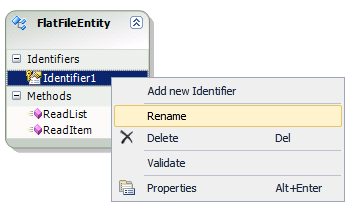
- In the BDC Model Designer, right click Identifier1 and select Rename
- Rename the Identifier to ID
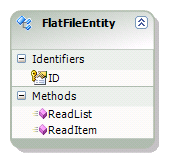
After the Identifier is configured the remaining parameters are configured
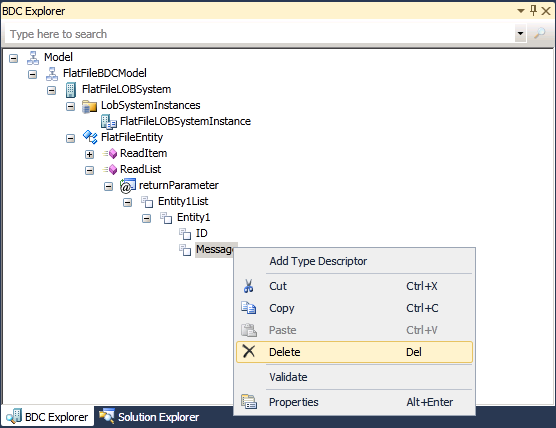
- First, remove the message parameters since they are not needed. To remove the message parameter from the finder method select the message node in the BDC Explorer, right click, and select Delete.
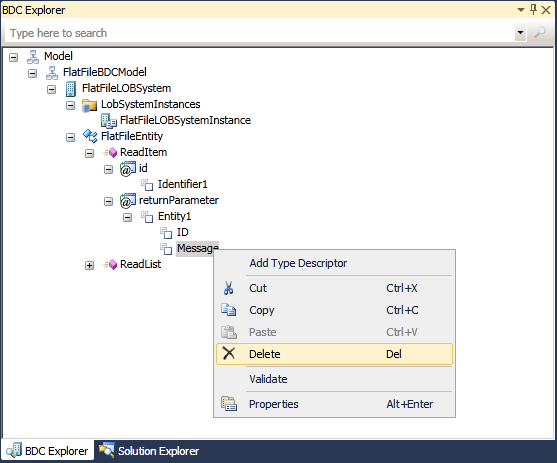
- To remove the message parameter from the specific finder method select the message node in the BDC Explorer, right click, and select Delete.
- Next, add the parameters which map to the data in the flat-file-data-source.txt file. Use steps 29-31 to add the parameters listed in the table below.
- In the BDC Explorer, right click Entity1 and select Add Type Descriptor
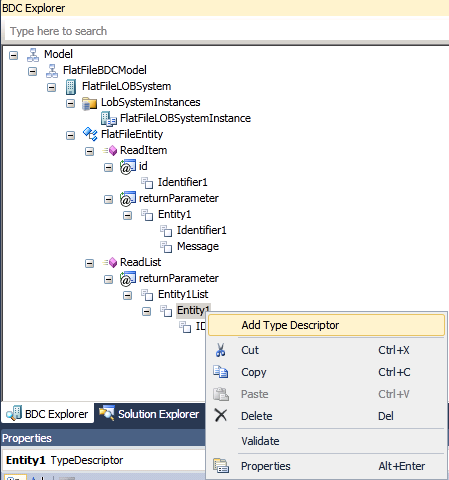
- In the Properties window change the Name property to match the name of the property you are adding from the table above.
- In the Properties window change the Type Name property to match the data type of the property you are adding from the table above.
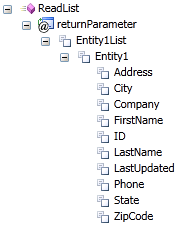
Once all the parameters are added the BDC Model looks like this in the BDC Explorer:
- Next, copy the parameters from the finder method to the specific finder method. To do this perform steps 33-35 for each return parameter in the finder method.
Note: The ID parameter is already configured and does not need to be copied from the finder method to the specific finder method.
- In the BDC Explorer select the parameter to copy, right click, and select Copy.
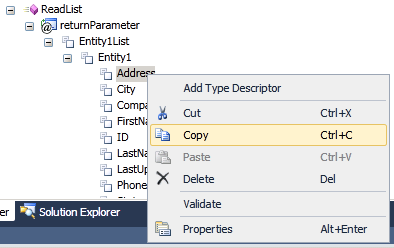
- In the BDC Explorer select the Entity1 node under the returnParameter node for the specific finder method, right click, and select Paste.
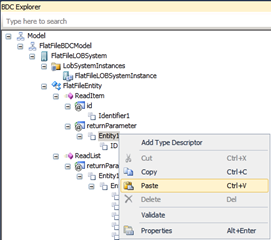
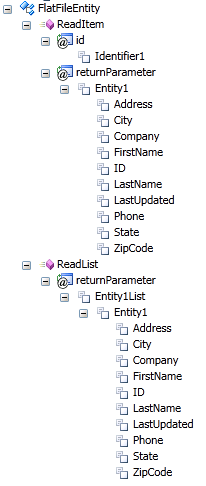
After all the parameters are copied the BDC Model looks like this in the BDC Explorer: - Next, edit the data type of the LastUpdated return parameter in the specific finder method. To do this, select the LastUpdated return parameter for the specific finder method.
- In the Properties window change the Type Name property to System.String
After the remaining parameters are configured the finder method instance properties are configured
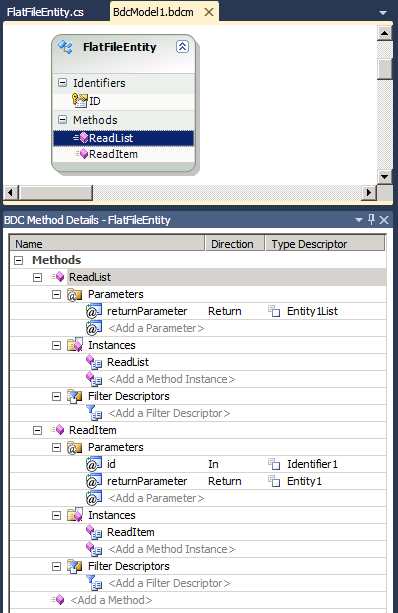
Configuring method instance properties may be done with the BDC Method Details window which Visual Studio 2010 now includes. Selecting a method in the BDC Designer displays the corresponding method instance in the BDC Method Details window, as seen in the screenshot below.
The BDC Method Details window works just like the BDC Explorer and the BDC Model Designer do with the Properties window.
- The RootFinder property on the finder method instance must be set to specify the finder method instance used to enumerate the items to crawl. This property does not have to be set if the finder method instance is not used for crawling. To set the RootFinder property on the finder method instance first click the ReadList node in the BDC Method Details window (highlighted in the screenshot below).
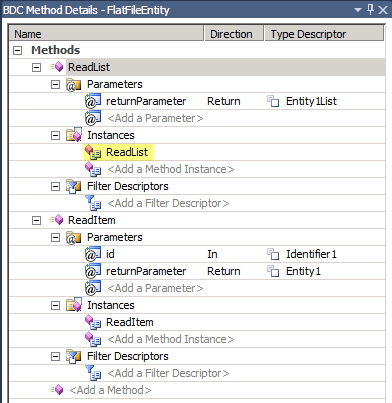
- Then, in the Properties window click the button in the Custom Properties row.
- In the Properties Editor, add the RootFinder property, with a data type of System.String and a value of x.

- The LastModifiedTimeStampField property on the finder method instance is set for two reasons.
1. So search results will display the last time the data was updated
2. So the search service knows if the data has been changed when executing incremental crawls.This property does not have to be set if the finder method instance is not used for crawling. To set the RootFinder property on the finder method instance first click the ReadList node in the BDC Method Details window (highlighted in the screenshot below).

- Then, in the Properties window click the button in the Custom Properties row.
-
In the Properties Editor, add the LastModifiedTimeStampField property, with a data type of System.String and a value of LastUpdated

Quick Cleanup
- In the Solution Explorer right click the FlatFileEntityService.cs class and select Open.
- The designer sometimes adds some unneeded code to the class that must be removed. Locate the following code and delete it. If you cannot locate this code then move on to the next step.
After the Entity and its properties are configured the methods and parameters are configured.
| Parameter Name | Data Type |
| Company | System.String |
| FirstName | System.String |
| LastName | System.String |
| Address | System.String |
| City | System.String |
| State | System.String |
| ZipCode | System.String |
| Phone | System.String |
| LastUpdated | System.DateTime |
public static FlatFileEntity ReadItem(string id)
{
    throw new System.NotImplementedException();
}
Deploy and Test
Deploying and testing the .NET Assembly Connector is a piece of cake!
Deploy
- In the Build menu, select Deploy Solution.
At this point Visual Studio 2010 compiles the .NET Assembly Connector code and packages the BDC Model and the feature which deploys both of these items into a WSP. The WSP is deployed to the SharePoint web site specified when the project was created. The feature in the WSP is automatically activated to register the External Content Type associated with the .NET Assembly Connector.
Test
- Open the SharePoint web site where Visual Studio 2010 deployed the WSP.
- Log in as a user who has the permission to create lists.
- Click the Site Actions menu
- Select View All Site Content
- Click Create
- In the Filter By section of the page click Lists
- Select External List
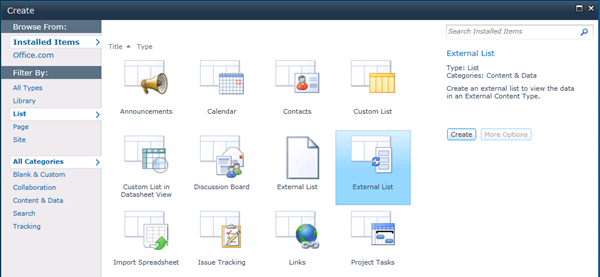
- Click the Create button
- In the Name textbox enter Flat File Data
- Click the button to browse the external content types.

- Select the FlatFileLOBSystemInstance in the External Content Type Picker

- Click OK
- Click Create
- View the data from the flat-file-data-source.txt file in the external list!

Where’s the XML?
I’m sure you noticed the lack of XML during this blog post. If you are curious where the XML is that defines the BDC Model follow these steps:
- In the Solution Explorer, right click the BdcModel1.bdcm file and select Open With…
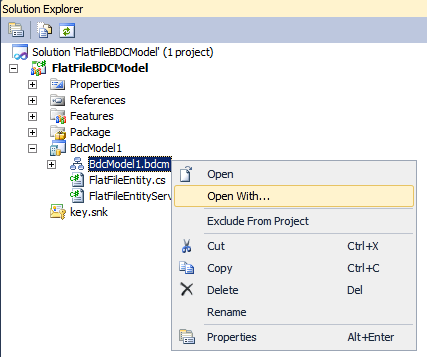
- In the Open With dialog select XML Editor
- Click OK
The complete BDC Model XML looks like this:
<?xml version="1.0" encoding="utf-8"?>
<Model xmlns:xsi="http://www.w3.org/2001/XMLSchema-instance" xmlns:xsd="http://www.w3.org/2001/XMLSchema" xmlns="http://schemas.microsoft.com/windows/2007/BusinessDataCatalog" Name="FlatFileBDCModel">
  <LobSystems>
    <LobSystem Name="FlatFileLOBSystem" Type="DotNetAssembly">
      <LobSystemInstances>
        <LobSystemInstance Name="FlatFileLOBSystemInstance" DefaultDisplayName="Customers">
          <Properties>
            <Property Name="ShowInSearchUI" Type="System.String">x</Property></Properties></LobSystemInstance>
      </LobSystemInstances>
      <Entities>
        <Entity Name="FlatFileEntity" Namespace="FlatFileBDCModel.BdcModel1" EstimatedInstanceCount="1000" Version="1.0.0.46">
          <Properties>
            <Property Name="Class" Type="System.String">FlatFileBDCModel.BdcModel1.FlatFileEntityService, FlatFileLOBSystem</Property>
          </Properties>
          <Identifiers>
            <Identifier Name="ID" TypeName="System.String" />
          </Identifiers>
          <Methods>
            <Method Name="ReadList">
              <Properties>
                <Property Name="RootFinder" Type="System.String">x</Property></Properties>
              <Parameters>
                <Parameter Direction="Return" Name="returnParameter">
                  <TypeDescriptor TypeName="System.Collections.Generic.IEnumerable`1[[FlatFileBDCModel.BdcModel1.FlatFileEntity, FlatFileLOBSystem]]" IsCollection="true" Name="Entity1List" DefaultDisplayName="2">
                    <TypeDescriptors>
                      <TypeDescriptor TypeName="FlatFileBDCModel.BdcModel1.FlatFileEntity, FlatFileLOBSystem" Name="Entity1" DefaultDisplayName="1">
                        <TypeDescriptors>
                          <TypeDescriptor TypeName="System.String" IdentifierName="ID" Name="ID" />
                          <TypeDescriptor Name="Company" TypeName="System.String" />
                          <TypeDescriptor Name="FirstName" TypeName="System.String" />
                          <TypeDescriptor Name="LastName" TypeName="System.String" />
                          <TypeDescriptor Name="Address" TypeName="System.String" />
                          <TypeDescriptor Name="City" TypeName="System.String" />
                          <TypeDescriptor Name="State" TypeName="System.String" />
                          <TypeDescriptor Name="ZipCode" TypeName="System.String" />
                          <TypeDescriptor Name="Phone" TypeName="System.String" />
                          <TypeDescriptor Name="LastUpdated" TypeName="System.DateTime" /></TypeDescriptors>
                      </TypeDescriptor>
                    </TypeDescriptors>
                  </TypeDescriptor>
                </Parameter>
              </Parameters>
              <MethodInstances>
                <MethodInstance Type="Finder" ReturnParameterName="returnParameter" Default="true" Name="ReadList" DefaultDisplayName="Entity1 List">
                  <Properties>
                    <Property Name="RootFinder" Type="System.String">x</Property>
                    <Property Name="LastModifiedTimeStampField" Type="System.String">LastUpdated</Property></Properties>
                  </MethodInstance>
              </MethodInstances>
            </Method>
            <Method Name="ReadItem">
              <Parameters>
                <Parameter Direction="In" Name="id">
                  <TypeDescriptor TypeName="System.String" IdentifierName="ID" Name="ID" />
                </Parameter>
                <Parameter Direction="Return" Name="returnParameter">
                  <TypeDescriptor TypeName="FlatFileBDCModel.BdcModel1.FlatFileEntity, FlatFileLOBSystem" Name="Entity1" DefaultDisplayName="3">
                    <TypeDescriptors>
                      <TypeDescriptor TypeName="System.String" IdentifierName="ID" Name="ID" />
                      <TypeDescriptor Name="Address" TypeName="System.String" />
                      <TypeDescriptor Name="City" TypeName="System.String" />
                      <TypeDescriptor Name="Company" TypeName="System.String" />
                      <TypeDescriptor Name="FirstName" TypeName="System.String" />
                      <TypeDescriptor Name="LastName" TypeName="System.String" />
                      <TypeDescriptor Name="LastUpdated" TypeName="System.String" />
                      <TypeDescriptor Name="Phone" TypeName="System.String" />
                      <TypeDescriptor Name="State" TypeName="System.String" />
                      <TypeDescriptor Name="ZipCode" TypeName="System.String" /></TypeDescriptors>
                  </TypeDescriptor>
                </Parameter>
              </Parameters>
              <MethodInstances>
                <MethodInstance Type="SpecificFinder" ReturnParameterName="returnParameter" Default="true" Name="ReadItem" DefaultDisplayName="Read Entity1" />
              </MethodInstances>
            </Method>
          </Methods>
        </Entity>
      </Entities>
    </LobSystem>
  </LobSystems>
</Model>
Stay Tuned!
Check back tomorrow for part two in this series which demonstrates how to register an external content type with the SharePoint search service to make the data searchable.


