
FREE WEBINAR: Creating real world mobile business applications with Microsoft PowerApps and Office 365
January 31, 2018
Working with Local and UTC Dates and Times in PowerApps
March 9, 2018
All of these coding guidelines and tips have been incorporated into the official PowerApps Canvas App Coding Standards and Guidelines whitepaper by Pat Dunn and myself. Get the whitepaper here!
[Updated 10-29-2018 with an additional guideline from Casey Burke, Program Manager on the CAP CDS 2.0 team.]
[Updated 8-8-2018 with additional guidelines from Mehdi Slaoui Andaloussi, Senior Program Manager on the PowerApps Team Look at the end of this post in the related articles section.]
[Updated with additional guidelines on 5-11-2018. Look for the Updates below.]
We’ve been doing a LOT of custom PowerApp development lately! Check out the other PowerApps articles on my blog and my YouTube Channel to see some of them and learn more about them.
To make our PowerApps high quality we follow a set of coding guidelines. Here they are, in all their glory (LOL!), for your enjoyment. Feel free to reuse them on your own projects.
A big shoutout and a special thanks goes out to Ian Davis, Alex Belikov, all my friends on the Microsoft PowerApps team for their contributions.
Keep in mind, these are not official coding guidelines from Microsoft!
Overall goals
- Simplicity
- Readability
- Supportability
- Ease of deployment and administration
- Performance
Variable naming
Be descriptive about a variable’s function. Think about what it is bound to and how it is used, then name it accordingly.
Here are some good examples:
disableSubmit
resetFields
hideNextButton
totalOpportunityCount
currentFilterValue
currentQuestionId
Here are some bad examples:
dSub
rstFlds
hideNxtBtn
ttlOppCt
cFV
cQId
Avoid short and cryptic variable names, like “EID”. Use EmployeeId instead.
Use camel casing.
Collection naming
Be descriptive about a collections contents. Think about what it contains and/or how it is used, then name it accordingly.
Here are some good examples:
OrdersCollection
MembersCollection
Here are some bad examples:
orderscoll
tempCollection
Use Pascal casing
Data source naming
Use the plural form when naming a Data Source
Here are some good examples:
Orders
Members
Here are some bad examples:
orders
member
Use Pascal casing
Control naming
This one can be done a couple of different ways, pick what works best for you and your specific PowerApp.
One way to do it is to take this approach:
Naming convention: <Control Type><function or data field>
Here are some good examples:
TextBoxZipCode
ButtonNext
Here are some bad examples:
zipcode
Next
Another way to do it is to take this approach:
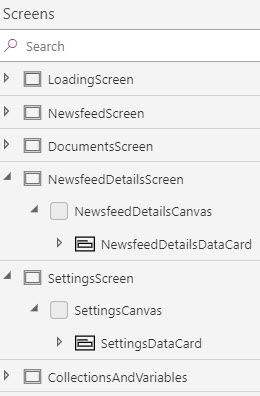
Naming convention: <ScreenName><Control Description>
Here’s an example from the Microsoft PowerApp Company Pulse template. Notice the Canvas controls don’t end up with the names Canvas and Canvas_1. This way I know exactly which screen and control I am working with all the time.
Personally, I prefer the second approach for 2 reasons.
- I can already tell what type on control I am interacting with by looking at the icon in the left hand pane that shows the controls, as well as the control breadcrumb at the bottom of the page.
- My control names never end with a _1, _2, _3, etc. when I have the same control on multiple screens in my PowerApp.
With either approach, avoid abbreviations.
Here are some good examples:
GalleryOrders
ButtonNext
Here are some bad examples:
GallOrders
BnNxt
Use Pascal casing
Click targets
There’s two ways you can approach this.
The first way is to group controls then assign click events to the group’s OnSelect event.
The second way is to lay a transparent rectangle on top of the group and use the rectangles OnSelect event.
I prefer the second way because it doesn’t impact my code as much if the controls in the group change and it also allows me to have more flexibility of the shape of the region I want to make clickable. See this article I wrote for more information about the transparent rectangle approach.
General coding guidelines
If possible, avoid logic in the OnVisible event in your PowerApp’s first screen. Instead, try to use inline expressions in control properties.
Limit your use of collections, try to use them only when absolutely necessary.
Limit your use of context variables, try to use them only when absolutely necessary.
Avoid passing context variables between screens when a global variable is more appropriate (and much easier to debug)!
Use ClearCollect instead of Clear;Collect().
Use CountIf instead of Count(Filter()).
Avoid lengthy expressions whenever possible!
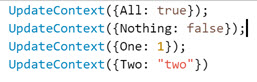
Each semi-colon should represent a line break.

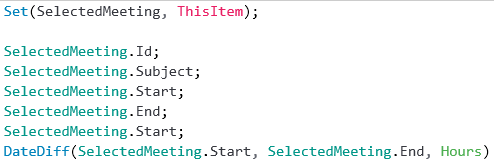
Update all necessary context variables in a single UpdateContext call
Like this:
![]()
Not this:
Use proper indentation
For long single line formulas, try to insert line breaks in reasonable places: before/after parentheses, commas, and colons.
Update: Avoid using unnecessary DataCards \ Canvases. Especially if they have nested galleries, which will not work in the future.
Update:
Don’t use multiple variables when you could just use a single one.

We could just use 1 variable here instead.
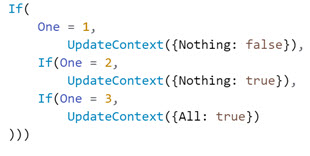
Update:
Avoid nesting in other operators too. For example in the ForAll function.
![]()
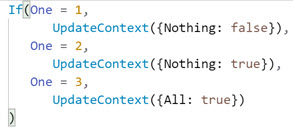
If statement syntax
Don’t ‘nest’ secondary logical tests by explicitly writing If after the initial statement.
Do write secondary logical tests by simply writing out the logical test (w/o the ‘If’).
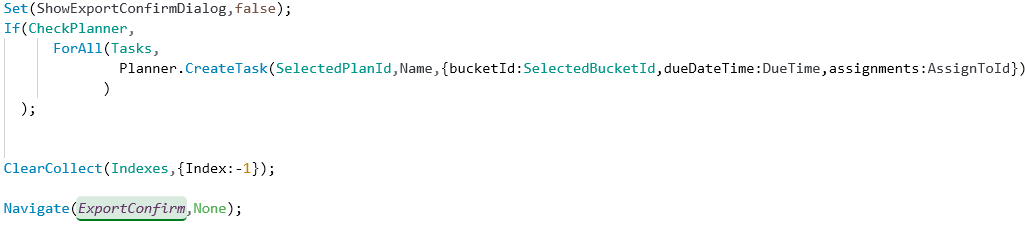
Update: Expensive calls
Do not make expensive calls before navigating to the next page. Try to make the loading of the next page instant and then in the background on the next page make the calls in the OnVisible page property. Use a loading dialog if necessary to let the user know progress is happening behind the scenes.
Here is a bad example in an OnSelect event that goes to the next page.
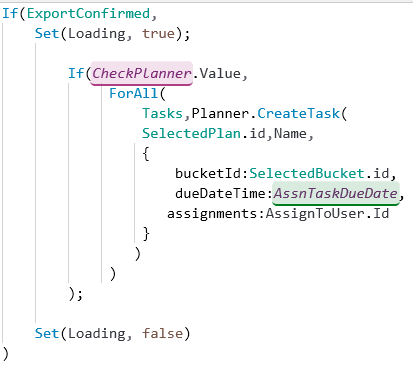
Here’s a better example in the OnSelect event:
![]()
And in the OnVisible event in the next page:
Minimize the number of controls you create
For example, instead of having 4 image controls laying on top of each other with different Visible property settings, use one image with logic in its Image property to show different images.

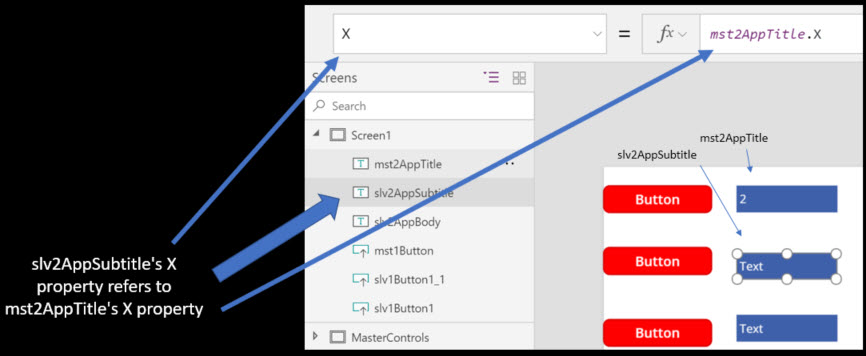
Use parent/child relationships for relative styling
Have one control’s styling be used as the master to style other controls. In general, use relative styling for the color, fill, x, y, width, height properties.
Galleries
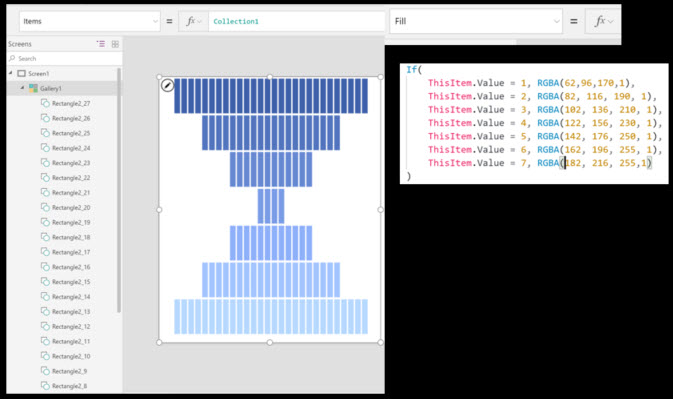
Use galleries for almost everything that is repetitive and linear.
The brute force method may be the fastest to make initially, but it will be very painful to modify later.
If you have a series of info/controls to present which seem repetitive, always consider if you can combine a clever internal collection with a gallery.
Update 10-29-2018: Nesting gallery controls inside fluid grid controls is not supported and should not be done.
Forms
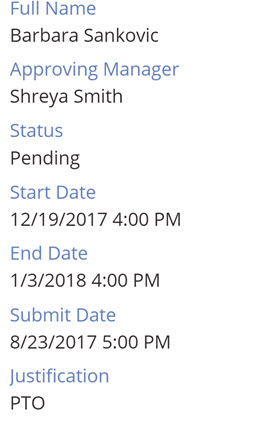
Use forms for repetitive data entry fields.
Use forms to quickly group a number of fields versus using several textboxes.
A form for data like this is much easier to work with than individual textboxes because Forms allow you to take advantage of parent/child relationships to implement relative styling.
Code comments and documentation
COMMENT YOUR CODE!
To comment code in PowerApps you can use this simple trick; simply put your comments in quotes, like this:

Create pages to document the collections and variables used in the PowerApp. Don’t link to these pages from the other pages in your app, they are only seen when the PowerApp is open in edit mode.
Here’s an example from the Microsoft PowerApp Company Pulse template.

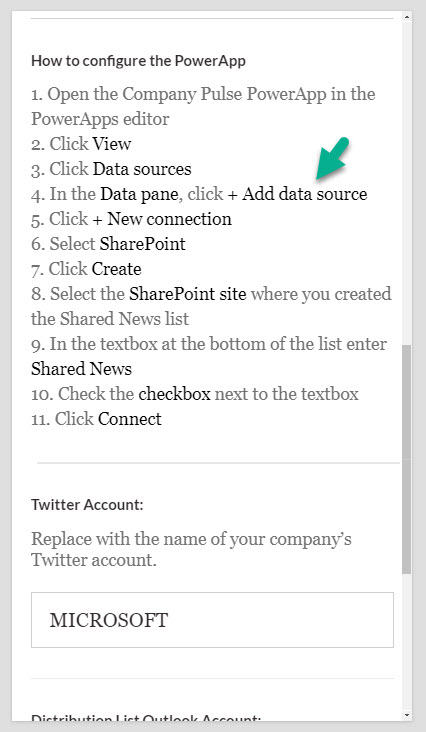
Create pages to document the setup process for your PowerApp. Don’t link to these pages from the other pages in your app, they are only seen when the PowerApp is open in edit mode. Most PowerApps rely on a data source you must create, like a SharePoint list, an Excel document, a CDS Entity, or a Flow. Document how to create the data sources and any other assets your PowerApp relies upon to work.
Here’s an example from the Microsoft PowerApp Company Pulse template.

Configuration values
Use textboxes in the setup pages to make it very easy for you to change application settings without editing code. This allows the folks who deploy your application to quickly set these values and reduces the chance our code gets messed up during deployment. Think of this like the Application Settings screen for an ASP.NET web application in the Azure portal that allows you to set the Applications Settings you could also set in the web.config file.
Here’s an example from the Microsoft PowerApp Company Pulse template. Here you can see textboxes that allow the PowerApps admin to configure settings values.
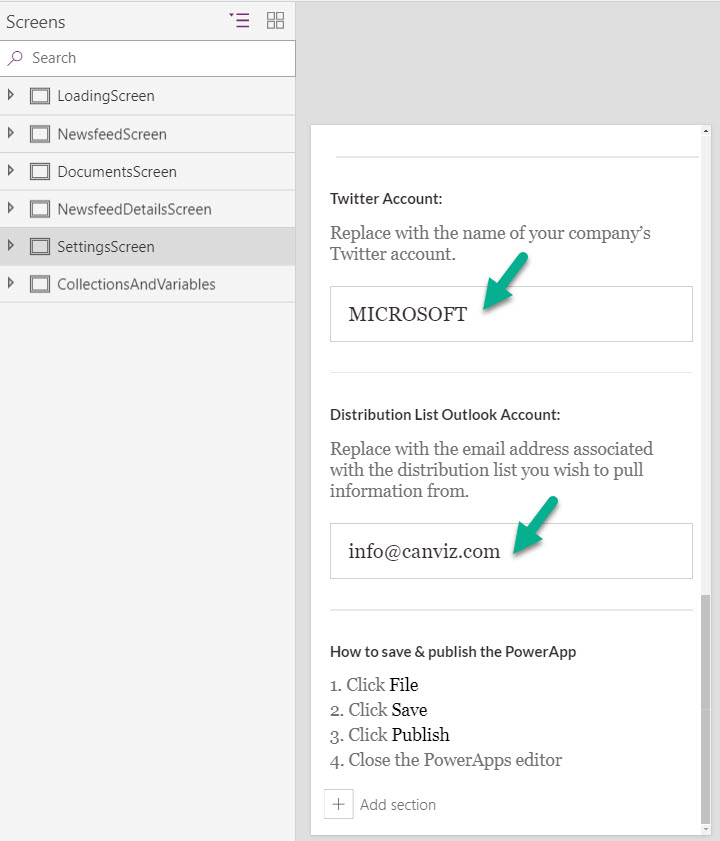
Here you can see the name of the textbox control used to hold the Twitter account settings value.
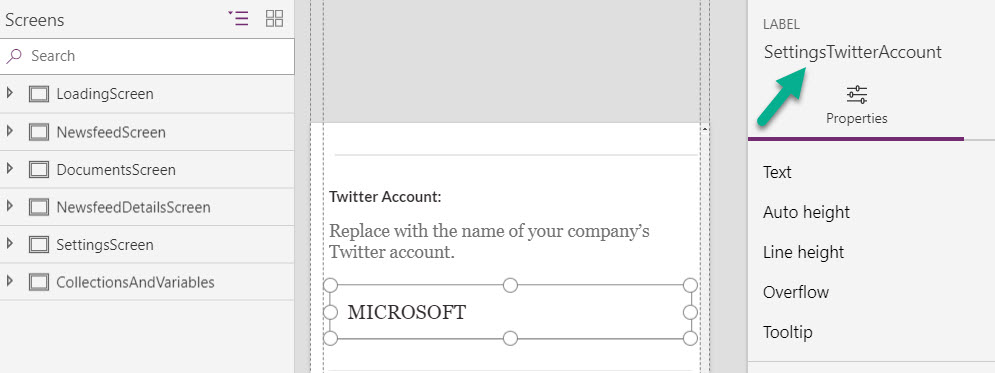
Here you can see where the value is used to return Tweets for the Twitter account from the Twitter connector.

Common Data Service (CDS)
Use a single screen to handle edit/insert operations.
If possible, use a CardGallery to handle updating data instead of referencing individual controls in a Patch function.
When naming context variables, indicate which record they are associated with.
Before moving a PowerApp between environments do the following things.
Remove the data sources. Make sure you provide instructions on the setup pages that describe how to add them back to the application. Here’s an example from the Microsoft PowerApp Company Pulse template where we do that.
Make sure all your application settings are defined. For example, choose an icon (don’t use the generic one that it comes pre-set with!), give the PowerApp a name, description and category, and select a background color. If you want to use a background color that is not in the color picker see this article on my blog.
Excel formatting
PowerApps use DataTables in Excel to connect to data in Excel worksheets. Keep these things in mind when creating Excel documents as data sources.
Name your DataTables with a descriptive name, you will see it in the PowerApp when you write the code to connect to it.
Use one DataTable per worksheet.
Name the DataTable and Worksheet the same.
Use descriptive column names in the Data Tables.
Use Pascal casing
Multiple form factors
When you make the same PowerApp and target both Phone and Tablet layouts, first create one version of the PowerApp, run it through testing and finalize it. Then, convert it to the other version before you modify the layout and screens. This ensures that your expressions, controls, variables, data sources, etc. all have the same names. This makes it MUCH easier to support the PowerApps and develop it. See this article on my blog to see how to convert one form factor to another.
Related articles
I encourage you to read these articles from Mehdi as well.
