SharePoint Feature Manager Updated Version Now Available
March 6, 2007SharePoint Connections Sessions Follow Ups
April 13, 2007HOW TO: Create a custom Windows Workflow Activity and make it available in SharePoint Designer
Recently we (SharePoint Experts) have been utilizing Workflows inside MOSS to automate many of our internal business processes. Last night, while trying to automate a process, Dustin let me know that the Send an Email Activity, available by default in SPD, does not allow you to specify a from email address. He asked me if I could create a custom Workflow Activity to send emails that would provide the ability to specify a from email address.
I looked at several examples on the Internet and inside the ECM Starter Kit and none of the materials I found online provide step by step instructions. This slowed down my development efforts and made me think that this topic would be an excellent blog post to help people out, so I’m typing it up to help everyone who may want to create a custom Windows Workflow Activity and make it available in SharePoint Designer.
I developed the C# code you will see in this blog post and Dustin was instrumental in helping me hook in the existing form that is utilized by the out of the box Send an Email Activity in SPD.
To begin, let’s cover the components necessary to create a custom Windows Workflow Activity and make it available in SPD.
The main pieces of the puzzle are as follows:
- The assembly that contains the custom Workflow Activity class.
- The web.config file corresponding to the SharePoint Web Application on your server where the custom Workflow Activity will be used.
- The WSS.ACTIONS file on your SharePoint server that registers Workflow Actions with SPD.
The following instructions will create a custom Workflow Activity in VS 2005. The Activity takes several input parameters and sends an email based on the parameters. This Activity reuses the existing form that is utilized by the out of the box Send an Email Activity in SPD which provides the ability to look up users to populate the To and CC fields, as well as entering the Subject and Body for the email.
UPDATE: Fabian Mortiz has an excellent article that describes how to take my code sample and extend it to read lookup fields inside the body of the email. You can find his article here: http://weblogs.mysharepoint.de/fabianm/archive/2007/08/27/workflow-entwicklung-teil-2-e-mail-aktivit-t-mit-benutzerdefinierter-absenderadresse-f-r-den-sharepoint-designer.aspx
Here is a list of the input parameters this custom Activity uses:
SMTPServerName – specifies which SMTP server will send the email.
FromEmailAddress – specifies who the email is from.
To – specifies who the email is sent to.
Subject – specifies the subject of the email.
Body – specifies the body of the email.
CC specifies who will be copied on the email.
To create the assembly that contains the custom Workflow Activity class, perform the following steps.
- Open VS 2005.
- Click File| New | Project.
- In the Project Types tree select Workflow.
- In the Templates list box select Workflow Activity Library.
- In the Name text box enter Sample.ActivityLibrary.
- Click the OK button.
To create the class for the custom Workflow Activity, perform the following steps.
- In the Solution Explorer, right click the Sample.ActivityLibrary node.
- Select Add | Activity.
- In the Add New Item window, select Visual C# Project Items in the Categories tree.
- Select Activity in the Templates list box.
- In the Name text box enter CustomEmailActivity.cs.
- Click the Add button.
- In the Solution Explorer, right click the CustomEmailActivity.cs file and select View Code.
-
Replace the contents of the class with the following code:
using System;
using System.ComponentModel;
using System.ComponentModel.Design;
using System.Collections;
using System.Diagnostics;
using System.Drawing;
using System.Workflow.ComponentModel;
using System.Workflow.ComponentModel.Design;
using System.Workflow.ComponentModel.Compiler;
using System.Workflow.ComponentModel.Serialization;
using System.Workflow.Runtime;
using System.Workflow.Activities;
using System.Workflow.Activities.Rules;namespace Sample.ActivityLibrary
{
/// <summary>
/// This class deines a custom Windows Workflow Activity that sends emails
/// </summary>
public partial class CustomEmailActivity : Activity
{//Create a variable to access the Event Log when errors need to be logged
private EventLog _eventLog;#region DepedencyProperties for the Activity
public static DependencyProperty BCCProperty = DependencyProperty.Register("BCC", typeof(ArrayList), typeof(CustomEmailActivity));
public static DependencyProperty BodyProperty = DependencyProperty.Register("Body", typeof(string), typeof(CustomEmailActivity));
public static DependencyProperty CCProperty = DependencyProperty.Register("CC", typeof(ArrayList), typeof(CustomEmailActivity));
public static DependencyProperty SubjectProperty = DependencyProperty.Register("Subject", typeof(string), typeof(CustomEmailActivity));
public static DependencyProperty ToProperty = DependencyProperty.Register("To", typeof(ArrayList), typeof(CustomEmailActivity));
public static DependencyProperty FromEmailAddressProperty = DependencyProperty.Register("FromEmailAddress", typeof(string), typeof(CustomEmailActivity));
public static DependencyProperty SMTPServerNameProperty = DependencyProperty.Register("SMTPServerName", typeof(string), typeof(CustomEmailActivity));#endregion
#region Properties
[ValidationOption(ValidationOption.Required)]
public string FromEmailAddress
{
get
{
return (string)base.GetValue(FromEmailAddressProperty);
}
set
{
base.SetValue(FromEmailAddressProperty, value);
}
}[ValidationOption(ValidationOption.Required)]
public string SMTPServerName
{
get
{
return (string)base.GetValue(SMTPServerNameProperty);
}
set
{
base.SetValue(SMTPServerNameProperty, value);
}
}[ValidationOption(ValidationOption.Optional)]
public string Body
{
get
{
return (string)base.GetValue(BodyProperty);
}
set
{
base.SetValue(BodyProperty, value);
}
}[ValidationOption(ValidationOption.Optional)]
public ArrayList CC
{
get
{
return (ArrayList)base.GetValue(CCProperty);
}
set
{
base.SetValue(CCProperty, value);
}
}[ValidationOption(ValidationOption.Required)]
public string Subject
{
get
{
return (string)base.GetValue(SubjectProperty);
}
set
{
base.SetValue(SubjectProperty, value);
}
}[ValidationOption(ValidationOption.Required)]
public ArrayList To
{
get
{
return (ArrayList)base.GetValue(ToProperty);
}
set
{
base.SetValue(ToProperty, value);
}
}#endregion
#region Contructor
public CustomEmailActivity()
{
InitializeComponent();
}#endregion
#region Overidden Methods
protected override ActivityExecutionStatus Execute(ActivityExecutionContext executionContext)
{
//Set up the Event Logging object
_eventLog = new EventLog("Workflow");
_eventLog.Source = "SharePoint Workflow";try
{
//Send the email
SendEmail();
}
finally
{
//Dispose of the Event Logging object
_eventLog.Dispose();
}//Indicate the activity has closed
return ActivityExecutionStatus.Closed;
}#endregion
#region Private Methods
private void SendEmail()
{
try
{
//Create a new object that will send the email
System.Net.Mail.MailMessage msg = new System.Net.Mail.MailMessage();
//Create an object to specify the from address for the email
System.Net.Mail.MailAddress fromAddress = new System.Net.Mail.MailAddress(FromEmailAddress);
//Set the from email address on the message object
msg.From = fromAddress;
//Add the email addresses stored in the To property to the email message object
for (int i = 0; i < To.Count; i++)
{
msg.To.Add(To[ i ].ToString());
}
//Add the email addresses stored in the CC property to the email message object
for (int i = 0; i < CC.Count; i++)
{
msg.CC.Add(CC[ i ].ToString());
}
//Mark the message body as HTML
msg.IsBodyHtml = true;
//Populate the subject for the message
msg.Subject = Subject;
//Populate the body for the message
msg.Body = Body;
//Create an object to represent the mail server that will send the message
System.Net.Mail.SmtpClient client = new System.Net.Mail.SmtpClient(SMTPServerName);
//Set the credentials used to authenticate to the email server
client.UseDefaultCredentials = true;
//Send the message
client.Send(msg);
}
catch (System.Exception Ex)
{
//Log exceptions in the Event Log
_eventLog.WriteEntry("SMTP Server Name: " + SMTPServerName +
Environment.NewLine +
"From: " + FromEmailAddress +
Environment.NewLine +
"To: " + To +
Environment.NewLine +
"CC: " + CC +
Environment.NewLine +
"Subject: " + Subject +
Environment.NewLine +
"Body: " + Body +
Environment.NewLine +
"Error: " + Ex.InnerException.ToString()
, EventLogEntryType.Information);
}
}#endregion
}
} - Save the file.
- Click Build | Build Sample.ActivityLibrary.
-
Finally, sign the assembly.
- Right click on the Sample.ActivityLibrary node in the Solution Explorer.
- Select Properties.
- Click the Signing tab.
- Check the Sign the assembly checkbox.
- In the Choose a strong name key file dropdown list select New.
- Name the key file Sample.ActivityLibrary.snk.
- Uncheck the Protect my key file with a password checkbox.
- Click the OK button.
- Build the Assembly.
-
Obtain the PublicKeyToken for your assembly.
- Open a command prompt.
- Change to the output directory of your Sample.ActivityLibrary project.
- Issue the following command: sn –T Sample.ActivityLibrary.dll
-
Copy the value returned, and paste it into the AssemblyInfo.cs file in the Sample.ActivityLibrary project.
- You will use this value later in the deployment process.
- Make sure you comment out the line, like this:
//Public key token is <Your PublicKeyToken will appear here>
- Deploy the assembly to the GAC on your SharePoint Server.
To edit the web.config file on your SharePoint server so the Activity has permissions to execute, perform the following steps.
- Open the web.config file corresponding to the SharePoint Web Application on your server where the custom Workflow Activity will be used.
- Locate the <authorizedTypes> section.
-
Add the following XML inside the <authorizedTypes> section:
<authorizedType Assembly="Sample.ActivityLibrary, Version=1.0.0.0, Culture=neutral, PublicKeyToken=<Insert Your PublicKeyToken Here> " Namespace="Sample.ActivityLibrary" TypeName="*" Authorized="True" />
- Return to your AssemblyInfo.cs file.
-
Copy the Public Key Token you added to the class.
- Return to the web.config file.
- Replace the <Insert Your PublicKeyToken Here> placeholder with the value you copied from the web.config file.
- Save the web.config file.
To edit the WSS.ACTIONS file on your SharePoint server register the custom Activity with SPD, perform the following steps.
-
Open the WSS.ACTIONS file on your SharePoint server.
- The file is located in the following directory:
C:Program FilesCommon FilesMicrosoft Sharedweb server extensions12TEMPLATE1033Workflow
- Locate the <Actions> section.
- Add the following XML inside the <Actions> section.
<Action Name="Custom Email Action"

    ClassName="Sample.ActivityLibrary.CustomEmailActivity"

    Assembly="Sample.ActivityLibrary, Version=1.0.0.0, Culture=neutral, PublicKeyToken=9fed0241ddc0b7ef"

    AppliesTo="all"

    Category="Sample">

        <RuleDesigner Sentence="Send %1 from %2 via SMTP host %3.">

            <FieldBind Field="To,CC,Subject,Body" Text="this message" DesignerType="Email" Id="1"/>

            <FieldBind Field="FromEmailAddress" Text="this address" Id="2" DesignerType="TextArea"/>

            <FieldBind Field="SMTPServerName" Text="SMTP Server" Id="3" DesignerType="TextArea"/>

        </RuleDesigner>

        <Parameters>

            <Parameter Name="To" Type="System.Collections.ArrayList, mscorlib" Direction="In" />

            <Parameter Name="CC" Type="System.Collections.ArrayList, mscorlib" Direction="Optional" />

            <Parameter Name="Subject" Type="System.String, mscorlib" Direction="In" />

            <Parameter Name="Body" Type="System.String, mscorlib" Direction="Optional" />

            <Parameter Name="FromEmailAddress" Type="System.String, mscorlib" Direction="In" />

            <Parameter Name="SMTPServerName" Type="System.String, mscorlib" Direction="In" InitialValue="127.0.0.1" />

        </Parameters>

</Action> - Save the file.
- Reset IIS.
So what does this XML do? Let me explain.
The Action element specifies how the Activity will appear and be categorized when you click the Add button in SPD to add an Activity to a Workflow. The Action element also specifies what assembly and class the Action is contained in.
The RuleDesigner element specifies the text and links displayed in SPD once the Activity has been added to a Workflow in SPD.
The FieldBind elements inside the RuleDesigner element map the input controls to the Parameter elements defined in the Parameters element. Their IDs correspond to the %# arguments in the Sentence attribute inside the RuleDesigner element. The Text attributes correspond to the links displayed in SPD. The DesignerType attributes correspond to the type of control that will be used for input.
Note:
Notice the following line of XML is used to map multiple properties to the out of the box form that comes with the Send an Email Action. This is how we were able to reuse that form!
<FieldBind Field="To,CC,Subject,Body" Text="this message" DesignerType="Email" Id="1"/>
The Parameter elements map the properties of the custom Workflow Action to the properties defined in the class that represents the custom Workflow Activity. The Name attributes must match the names of the properties defined in the class that represents the custom Workflow Activity. The Type attributes must match the types of the properties defined in the class that represents the custom Workflow Activity.
To test the activity, perform the following steps. These steps will create a simple workflow and deploy it to the Announcements list in a Team Site.
- Create a Team Site on your SharePoint Server.
- Open SharePoint Designer.
- Click File | Open Site.
- In the Site name text box, type in the URL to the Team Site you just created.
- Click the Open button.
- Click File | New | Workflow.
- In the Give a name to this workflow text box enter: Custom Email Action Test Workflow.
- Click the Next button.
- Click the Actions button and select More Actions.
- In the Select a Category drop down list select Sample.
- Highlight Custom Email Action in the Choose an Action list box.
- Click the Add button.
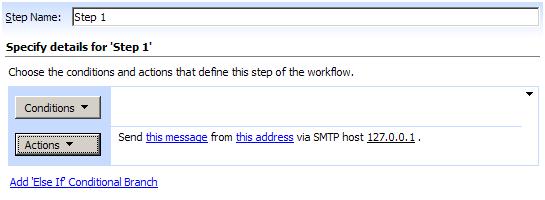
-
The Custom Email Action then appears in SPD, it looks like this:
- Next, click the ‘this message’ link.
-
The out of the box form that comes with the Send an Email Activity will appear since we are reusing it. It looks like this after you populate it with values.

- Click the OK button when you are finished filling out the form.
- Next click the ‘this address’ link and type in who the email is from.
- Finally, click the ‘127.0.0.1’ link and type in the name of your mail server if it is different from your SharePoint server.
-
When you are finished specifying parameters, SPD looks like this (Note: you screen will look different when you use different parameters.):
- Click the Finish button.
- Open IE and navigate to the Team Site you created in step 1 above.
- Click the Announcements link.
- Mouse over the Get Started with Windows SharePoint Services! List Item.
- Right click the arrow that appears and select Workflows in the drop down menu.
- Select the Custom Email Action Test Workflow you just created by clicking on the hyperlink.
- When the page refreshes, click the Start button to start the workflow.
- When the page refreshes you will see the Custom Email Action Test Workflow has completed.
-
The page will look like this:


Victory! Well done, you just created a custom Windos Workflow Activity, registered it with SPD, and used it inside a SharePoint Workflow!
NOTES:
- If sending the email fails, you will notice the status will be set to ‘Completed’ inside the List the workflow has been assigned to. This is because I did not return any failure information to SharePoint when an exception occurred while trying to send the email, since I am trying to keep this example simple.
-
To see diagnostic information related to the Workflow, look in the Event Logs.
- To demonstrate the Event Logging built into the custom Activity, I configured my mail server to deny relaying to show you an example of the information logged in the Event Log when an Exception occurs. This is what it looks like:
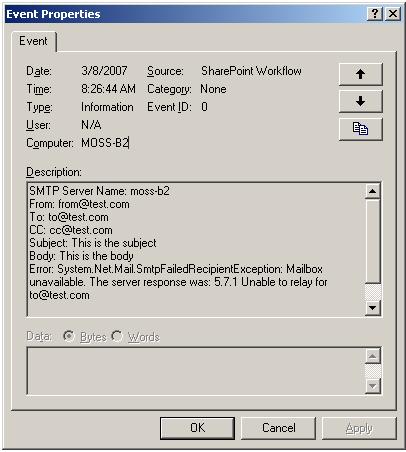
- As you can see, the email was not sent due to the relaying permissions set on my development server.
-
Another thing that this custom Workflow Activity does not implement is validation of user input, so you’ll need to add that on your own.
- For example, if you enter an invalid email address, like “user”, instead of users@user.com, the .NET objects that send email will fail.