HOW TO: Enhance SharePoint User Profiles With The Business Data Catalog
March 8, 2009SharePoint On The Web and AdventureWorks Travel Site Installer Released!
May 18, 2009Cleaning Up Orphaned Network Adapters After Migrating MS VPC 2007 / MS VS 2005 VPCs to Hyper-V
Sometimes you are unable to remove the Virtual Machine Additions and network adapters from a VPC made with the Microsoft Virtual PC 2007 / Microsoft Virtual Server 2005 VPC format before you migrate it to the Hyper-V format. When this happens orphaned network adapters exist in the migrated VPC. You may not even know you have orphaned network adapters until you reboot your migrated Hyper-V VPC for the first time. These network adapters can wreak havoc on your Hyper-V VPC.
This post describes how to migrate a Microsoft Virtual PC 2007 / Microsoft Virtual Server 2005 VPC to Hyper-V format when you are unable to remove the Virtual Machine Additions and network adapters before you turn on the VPC in Hyper-V. The steps in this blog post cause the orphaned network adapters to appear in the migrated VPC and also describe how to remove the orphaned network adapters.
Before we begin I’d like to mention there are several blog posts which document some of the same steps you will find here, here are my favorites.
http://technet.microsoft.com/en-us/library/dd296684.aspx
http://blogs.technet.com/matthts/archive/2008/09/12/vmc-to-hyper-v-import-tool-available.aspx
I haven’t been able to find one blog post which walks through all of the steps and ties them together in this context. All of the blog posts and instructions I’ve found describe how to migrate VPCs assuming you can remove the Virtual Machine Additions and network adapters before you start the VPC in Hyper-V. That’s why I created this post. 🙂
Migrate the Microsoft Virtual PC 2007 / Microsoft Virtual Server 2005 VPC to Hyper-V
To begin, create a new Hyper-V VPC in the Hyper-V Manager. When prompted for the hard drive location select the VHD file for the Microsoft Virtual PC 2007 / Microsoft Virtual Server 2005 VPC you want to migrate to Hyper-V format and start the VPC.
After the VPC is booted up, remove the Virtual Machine Additions left over from the MS VPC 2007 / MS VS 2005 image.
When prompted to restart click Yes.
After the VPC reboots, install the Hyper-V Integration Services.
When prompted to upgrade the HAL, click OK.
You will be prompted for the location of the halaacpi.dll.
Insert your OS installation media DVD and attach the VPC to it. (You can also use a mounted ISO file.)
Browse to the I386 directory on the installation media and click Open.
Click OK.
When prompted to restart click Yes.
After the VPC reboots click Cancel on all the Found New Hardware Wizard dialogs.
Insert the Integration Services Setup Disc again.
You will be prompted for the location of the hidusb.sys.
Insert your OS installation media DVD and attach the VPC to it. (You can also use a mounted ISO file.)
Browse to the I386 directory on the installation media and click Open.
Click OK.
At this point your mouse will fail to work in the VPC and you will see the following screen.
Use the keyboard to select No, not this time., and select the Next button.
On the next screen, use your keyboard to select Install from a list or specific location (Advanced) and select the Next button.
On the next screen, use your keyboard to deselect Search removable media (floppy, CD-ROM…) and select Include this location in the search:. Enter or browse the the I386 directory on your OS installation media and select the Next button.
The mouse driver installation begins.
Select the OK button.
Enter the path to the I386 directory on your OS installation media and select the OK button.
The mouse driver installation completes.
Hooray! You mouse works again in the VPC and you no longer need to use CRTL-ALT-LEFT ARROW to release it from the VPC and return to the host machine. Click Finish.
When prompted to restart click Yes.
Once the VPC reboots you will notice the network connection icon in the System Tray indicates the network adapter has limited or no connectivity.
Inspecting the Network Connections reveals a network adapter named Local Area Connection 3.
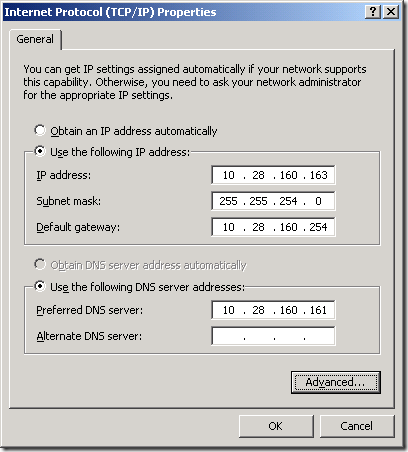
Opening the properties for the network connection reveals that any static IP addresses and DNS information which was originally set up in the VPC (before it was migrated to Hyper-V) needs to be reconfigured.
Reconfigure the network adapter to use the original network settings.
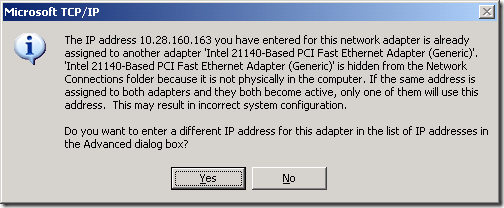
Click OK and the following error occurs.
The IP address <IP Address> you have entered for this network adapter is already assigned to another adapter ‘<Name of network adapter>’.
‘<Name of network adapter>’ is hidden from the Network Connection folder because it is not physically in the computer. If the same address
is assigned to both adapters and they both become active, only one of them will use this address. This may result in incorrect system configuration.
Click Yes to essentially cancel the action. Click Cancel to close the dialog.
Removing the orphaned network adapters
At this point the orphaned network adapters must be removed so the newly reconfigured network adapter settings won’t conflict with the orphaned network adapter.
This Microsoft support article describes how to do this. The steps in the article are described below.
First open a command prompt and enter the following commands. The first command configures the Device Manager to show hidden devices. The second command opens Device Manager.
Notice only one Network Adapter is displayed in the default view of the Device Manager.
In the View Menu, select Show hidden devices. Now notice several Network Adapters are displayed in the Device Manager. The ‘grayed out’ network adapters are the orphaned network adapters that will be removed.
To remove the orphaned network adapters, right click them and select Uninstall.
Click OK when prompted to confirm the uninstall.
After you have removed the orphaned network adapters the Device Manager will look like this. This list will differ on depending on your VPC.
Now you can return to your new network adapter, configure it again and commit the configuration changes without receiving the error message.
At this point your migration is complete and the network settings for the VPC are properly restored.


