Creating a custom Site Definition in WSS V3 / MOSS
August 16, 2007SharePoint Connections 2007 Code Samples and Session Materials
November 8, 2007Creating and deploying VSTO Documents inside SharePoint Document Libraries
This is a repost of an article that was lost due to a server crash.
Visual Studio Tools for Office (VSTO) Documents can be deployed to or utilized as templates for a SharePoint Document Library. The process to develop VSTO Documents, deploy them to the SharePoint server, and set the proper security policies on the client machine in order for the documents to run properly can be easily repeated once you understand all the pieces of the puzzle.
I have not been able to find complete documentation for this process on the Internet to date. I have found several web pages that provide pieces of the puzzle, but no comprehensive solution. I discussed this architecture with some Microsoft TS’s and they liked the architecture and approach and gave it two thumbs up.
VSTO Document Basics
To begin, it is important to understand how the VSTO Documents, the SharePoint server, and the target client machines interact.
The following diagram helps illustrate the architecture:
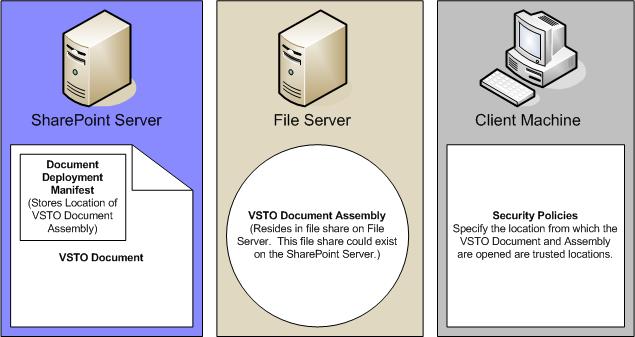
VSTO Documents contain a Deployment Manifest. Inside the Document’s Deployment Manifest, the location of the Assembly the VSTO Document relies upon is stored. This Deployment Manifest can be modified programmatically to point to any location where the Assembly the Document relies upon is stored. By default the Deployment Manifest specifies that the Assembly the document relies upon is stored in the same directory as the Document.
The VSTO Document’s Assembly can be deployed to any file share the user who opens the VSTO document has access to. This location can be on a stand alone file server, or even a file share on the SharePoint server itself. The VSTO Document’s Assembly is a .dll file.
In order for the client machine to properly load and render the VSTO Document and related Assembly, the client machine needs to trust the location from which the VSTO Document is opened and the location from which the Assembly is opened. Creating Security Policies on the client machine that trust the location from which the VSTO Document is opened allows the VSTO Document to properly load and render.
Scenario
The following scenario will be used as an example to demonstrate how to develop, configure and deploy a VSTO Document that will be used as a template for a SharePoint Document Library. Terms that appear in parenthesis are used to represent the various components of the solution and maintain consistency throughout the instructions.
An existing Word Document Template (Sample.dot) utilizes Macros to fill data in the Word Document Template. The majority of the data the users enter into the Macros to fill the document exists within a database, however users are presently keying the information into the Macro prompts manually. The document needs to be migrated to the VSTO format (VSTOSample.dot) in order to take advantage of the data in the database to expedite document creation.
Once the existing Word Document Template has been converted to the VSTO format the VSTO Document Template should be deployed as a template for a given document library (Sample Document Library) on the SharePoint Server (SampleSharePointServer).
Users must be able to open the VSTO Document Template from the Sample Document Library on the SampleSharePointServer and create a new Word Document from the VSTO Document Template. The new Word Document should be able to be saved to the Sample Document Library.
Prerequisites
This solution utilizes the following technologies:
Development environment:
Microsoft Office SharePoint Server 2007 (MOSS 2007)
Visual Studio .NET 2005
Visual Studio Tools for Office 2005 (VSTO 2005)
Client Machine:
Please see the following web page on the MSDN for client machine prerequisites and instructions for installing the prerequisites:
http://msdn2.microsoft.com/en-us/library/2ac08ee2(VS.80).aspx
The Solution
To successfully implement the aforementioned scenario several tasks need to be done.
These tasks are as follows:
- Convert the existing Word Document Template (Sample.dot) to the VSTO format (VSTOSample.dot).
- Create a share on a stand alone file server or the SampleSharePointServer server (This example uses a file share on the SampleSharePointServer.)
- Edit the VSTO Document Deployment Manifest to point to the file share where the VSTO Document’s Assembly is stored.
- Create a new Sample Document Library Feature in SharePoint for the document library that will utilize the VSTO Document Template. (Please see the Creating a Custom Document Library Feature in WSS V3 / MOSS 2007 article for instructions.)
- Install the Sample Document Library Feature on the SampleSharePointServer. (Please see the Creating a Custom Document Library Feature in WSS V3 / MOSS 2007 article for instructions.)
- Register the Sample Document Library Feature on the site definition you want the Sample Document Library to be created on when a new SharePoint site is created based on that site definition. (Please see the Adding a Document Library Feature to a Site Definition in WSS V3 / MOSS 2007 article for instructions.)
- Deploy the VSTOSample.dot file to the SampleSharePointServer.
- Deploy the VSTOSample.dll to the file share on the SampleSharePointServer.
- Create Security Policies on the client machine that trust the location the VSTOSample.dot file will be opened from.
- Test and rejoice!
Step 1: Convert the existing Word Document Template (Sample.dot) to the VSTO format (VSTOSample.dot)
To convert an existing Word Document Template (Sample.dot) to the VSTO format follow these steps:
Open Visual Studio .NET 2005.
Click File | New | Project.
Under Visual C# | Office, select Word Template.
Name the Project VSTOSample.
Click OK.
Select Copy an existing document. (Sample.dot)
Click OK.
At this point VS.NET 2005 converts the existing Sample.dot file to the VSTO format.
Rename Sample.dot in the VS.NET IDE to VSTOSample.dot.
*Note: This can also be done for Word Documents, Excel Workbooks and Excel Templates.
Select Word Document during project creation to convert a .doc file to the VSTO format.
Select Excel Workbook during project creation to convert a .xls file to the VSTO format.
Select Excel Template during project creation to convert a .xlt file to the VSTO format.
*Note: If you are not converting an existing Document follow the same steps as above except select Create a new document instead of Copy an existing document when the dialogue with these options appears during project creation.
Build the project.
Now let’s put some code into the document that will let us know the document was able to access the Assembly and execute code from it after we have deployed the document.
Open the ThisDocument.cs file in the VSTOSample project in the VS.NET 2005 IDE.
Add the following code to the ThisDocument_Startup method.
MessageBox.Show(“I’d rather be skiing!”);
Run the project. When the project runs the document will appear, then a textbox will appear with the message “I’d rather be skiing!”.
Click OK on the message box and close the document.
Let’s add some more code to the document to demonstrate how a VSTO document can be more efficient at populating documents with information compared to Macros.
First we will add an ActionsPane to the VSTO Document so we have a place to put some simple controls.
In the Visual Studio .NET 2005 IDE right click the VSTOSample project.
Click Add | New Item
Select Actions Pane Control
Name the control ActionsPane.cs
Click Add
Return to the ThisDocument.cs file in the VSTOSample project in the VS.NET 2005 IDE.
Add the following code at the class level:
Private ActionPane actionPane = new ActionPane();
Add the following code to the ThisDocument_Startup method:
this.ActionsPane.Controls.Add(actionPane);
Run the project. When the project runs the document will appear, then a textbox will appear with the message “I’d rather be skiing!” After you click the OK button the Document Actions Pane will appear on the right side of the VSTO Document.
Close the document.
Now let’s add some controls to the Actions Pane.
Open the ActionPane in design mode in VS.NET 2005.
Drag a ComboBox Control and drop it on the ActionsPane designer surface.
Name the ComboBox resortsComboBox
Right click the resortsComboBox control and select Properties
In the Properties Pane scroll to the Items Property and click the … button
Add the following items to the collection of items:
Arapahoe Basin
Wolf Creek Ski Area
Vail
Telluride
Steamboat
Alta
Now, let’s add a control to the document to display our favorite ski resort.
Open the VSTOSample.dot file in the VSTOSample project in design mode.
Add in a BookMark control to the ToolBox in the VS.NET 2005 IDE.
Right click on the ToolBox in the VS.NET 2005 IDE.
Click Choose Items…
Sort by Namespace
Select all the items in the Microsoft.Office.Tools.Word namespace.
Click OK
Type the words “My favorite ski resort is: “ into the document.
Drag a BookMark Control into the document and drop it at the end of the line you just typed.
Name the control favoriteSkiResortBookMark
Finally, let’s add an event handler to the resortsComboBox control to populate the document with the ski resort selected in the resortsComboBox.
Click the button to display the Event Handlers for the resortsComboBox control.
Double click in the SelectedIndexChanged event to create the event handler.
Open the ActionPane.cs file in code view.
Add the following code to the resortsComboBox_SelectedIndexChanged event handler method:
Globals.ThisDocument.favoriteSkiResortBookMark.Text = resortsComboBox.Text;
Run the project. Just like last time, when the project runs the document will appear, then a textbox will appear with the message “I’d rather be skiing!” After you click the OK button the Document Actions Pane will appear on the right side of the VSTO Document. The resortsComboBox control will be populated with the ski resorts you enetered. Selecting an item in the resortsComboBox will populate the document with the name of the selected ski resort in the location where you placed the favoriteSkiResortBookMark control.
Close the VSTOSample project.
*Note: This is a very simple demonstration that illustrates the power of VSTO Documents. Although the data in this example (The Ski Resort Names) does not come from a database, you can easily utilize the power of ADO.NET to return information from a database to populate data bound controls in the Actions Pane. Web Service calls may be used to retrieve the data from back end data sources, so your documents remain loosely coupled to your data layer.
Step 2: Create a share on a stand alone file server or the SampleSharePointServer server (This example uses a file share on the SampleSharePointServer.)
I’m going to assume you know how to do this. For example’s sake I’ll call this share: VSTODocs
Step 3: Edit the VSTO Document Deployment Manifest to point to the file share where the VSTO Document’s Assembly is stored.
I’ve taken care of wrapping the code that does this inside a handy little Windows Form Application that will do this for you. The VSTO Document Deployment Manifest Editor application allows you to easily edit the VSTO Document Deployment Manifest to point to the location where you will deploy the Assembly for the VSTO Document.
Here is a screenshot of the application:

To edit the VSTO Document’s Deployment Manifest simply click the Browse button and browse to the location of the VSTOSample.dot file then select it.
Then type in the UNC path for the file share you created in Step 2. (Make sure you type in the name of the .dll at the end of the path!)
Click the Edit Document Deployment Manifest button and you are done.
There is hardly any code under the hood here that actually edits the Document’s Deployment Manifest. I found the code to do this on the MSDN.
Here is the link to the page on the MSDN that has the code:
http://msdn2.microsoft.com/en-us/library/kck1ffhz(VS.80).aspx
Step 4: Create a new Sample Document Library Feature in SharePoint for the document library that will utilize the VSTO Document Template. (Please see the Creating a Custom Document Library Feature in WSS V3 / MOSS 2007 article for instructions.)
Step 5: Install the Sample Document Library Feature on the SampleSharePointServer. (Please see the Creating a Custom Document Library Feature in WSS V3 / MOSS 2007 article for instructions.)
Step 6: Register the Sample Document Library Feature on the site definition you want the Sample Document Library to be created on when a new SharePoint site is created based on that site definition. (Please see the Adding a Document Library Feature to a Site Definition in WSS V3 / MOSS 2007 article for instructions.)
These steps can be skipped if you do not want to make the document a template in a SharePoint Document Library. If you don’t want to make the document a template in a SharePoint Document Library and merely wish to upload the document to a SharePoint Document Library then proceed.
If you want to make the document a template in a SharePoint Document Library by using a SharePoint Feature please see the Creating a Custom Document Library Feature in WSS V3 / MOSS 2007 article for instructions.
Step 7: Deploy the VSTOSample.dot file to the SampleSharePointServer.
If you chose to perform steps 4, 5 and 6 then this task will already be accomplished.
If you chose not to perform steps 4, 5 and 6 then create a new SharePoint Site.
For examples sake create a site at the following location:
http://SampleSharePointServe/SiteDirectory/VSTOSample
Create a Document Library in the new VSTOSample SharePoint Site you created. Name the Document Library ‘Sample Document Library’. Upload the VSTOSample.dot file to the new Document Library you just created.
Step 8: Deploy the VSTOSample.dll to the file share on the SampleSharePointServer.
Copy the VSTOSample.dll file to the VSTODocs file share on the SampleSharePointServer.
Step 9: Create Security Policies on the client machine that trust the location the VSTOSample.dot file will be opened from.
The following commands are executed on the command line on the client machine.
These commands set up the necessary Security Policies on the client machine that specify the client trusts the location from which the VSTO Document was opened and the location where the Assembly is stored.
%windir%Microsoft.NETFrameworkv2.0.50727caspol -m -ag LocalIntranet_Zone -url “\SampleSharePointServervstodocs*” FullTrust -n “VSTO Documents”
%windir%Microsoft.NETFrameworkv2.0.50727caspol -m -ag LocalIntranet_Zone -url “http://SampleSharePointServer/sitedirectory/*” FullTrust -n “VSTO SharePoint Documents”
You’ll notice in both commands I use a wildcard in the paths. This allows me to trust all the documents and assemblies that are opened from these locations. In a development environment this is a nice approach to take because security is not a big consideration. However, in a production environment I recommend changing these paths to point to the particular VSTO Document and related Assembly.
These commands came from the following MSDN article:
http://msdn2.microsoft.com/en-us/library/ms404837(VS.80).aspx
*Note: To reset Security Policies to their default configuration run the following command at the command line on the client:
%windir%Microsoft.NETFrameworkv2.0.50727caspol -m -rs
Step 10: Test and rejoice!
Open Internet Explorer on the client machine.
Navigate to the VSTOSample SharePoint Site you created.
Look at the bottom toolbar of Internet Explorer.
Check to see the site is in the Local Intranet Zone. (We set the security policies on the Local Intranet Zone, so the paths we set as trusted apply to web sites opened in the Local Intranet Zone.)
Open the Sample Document Library.
Open the VSTOSample.dot file.
The VSTO Word Document Template should open and the “I’d rather be skiing!” Message Box should appear. The resortsComboBox should be populated with data, and selecting a resort will populate the document with the selected ski resort.
If this functionality works you have successfully deployed the VSTO Document to the SharePoint Document Library!
Save the VSTOSample VSTO Word Document Template to the Sample Documents Library by clicking File | Save.
Name the new file VSTOSample – Success.
Return to Internet Explorer and refresh the Sample Document Library page.
You will see you now have a Word Document named VSTOSample – Success.doc in the Sample Document Library.
Nice job! You just made a VSTO document and integrated it with MOSS 2007!